
DSL 运行时实践篇:逻辑层架构设计
一 前言
在上一章节中,重点介绍了 DSL 小程序的初始化流程,以及通信的架构设计。本章节我们将讲最核心的部分,就是页面是怎么渲染的。
二 逻辑层渲染流程
当应用实例 app 创建一个页面之后,本质上会 new 一个 Page 实例,那么 Page 实例里面做了哪些事情呢? 我们一起来看一下。
2.1 页面管理器

let notion = 'my_dsl_'
let id = 0
class Page {
   constructor(appInstance,pageConfig){
      this.pageId = notion + (++id)
      this.appInstance = appInstance
      const { path, js, render,css} = pageConfig
      this.css = css
      this.page = path
      /* 页面对应的 render 函数 */
      this.renderer = new Render(render,this)
      /* 页面对应的实例,这里执行业务的页面文件 index.js */
      js(PageRefInstance.bind(this), null, null, null, global.mydsl)

   }
   launch(query={}){
      /* 执行页面的 onload 方法 */
      this.appInstance.pageReady(this.pageId)
      this.appInstance.styleSheet(this.pageId,this.css)
      this.pageRef.onLoad && this.pageRef.onLoad(query)
      this.renderer.render()
   }
   /* 获取页面 id */
   getPageId(){
       return this.pageId
   }
   /* 页面隐藏时候触发 */
   unActive(){
      this.pageRef.onHide && this.pageRef.onHide()
   }
   /* 页面显示时候触发 */
   active(){
      this.pageRef.onShow && this.pageRef.onShow()
   }
   /* 触发更新 */
   render(directList){
      this.appInstance.render(this.pageId,directList)
   }
}- 当创建一个页面实例的时候,会递增产生一个 pageId 。接下来会从 pageConfig 中获取到 path, js, render, css。
- render 为渲染函数,结构如下所示:
render: function (context) {
      return [context.createNode("view", {
        "props": {}
      }, function (context) {
        return [context.createNode("bottom", {
          "props": {}
        }, function (context) {
          return ["点击"
          ]
        })
        ]
      })
      ]
    },
页面会创建一个 Render 实例来处理并保存虚拟 DOM, 接下来执行 js (被包装的 handleJS 函数),然后传入 PageRefInstance。代码类似如下:
function js(Page, App, Component, getCurrentPages, mydsl){
    Page({
        ...
        onLoad: function (options) {
          console.log(mydsl.navigateTo)
        },
    })
}
js(PageRefInstance.bind(this), null, null, null, global.mydsl)
如上 PageRefInstance 就是小程序的页面构造器,它就是业务代码中写的 Page 函数。并传入了 global.mydsl 这样就实现了在业务代码中使用 mydsl 对象。
那么 PageRefInstance 里面做了什么。来一起看一下:
/* 这个实例用于业务使用 */
function PageRefInstance(config){
    const pageController = this
    class PageElement {
       constructor(){
          for(let key in config){
            if(config.hasOwnProperty(key)) this[key] = config[key]
          }
       }
       getPageId(){
         return pageController.pageId
       }
       setData(mergeData){
          /* 合并 */
         Object.assign(this.data,mergeData)
         /* 更新数据 */
         pageController.renderer.render()
       }
    }
    pageController.pageRef = new PageElement()
}
如上执行 PageRefInstance 本质上创建了一个业务页面实例 PageElement, 并把他绑定到 Page 实例上,这里读者可能会有疑惑,PageElement 和 Page 有什么关系。
- Page :Page 是页面的管理实例,本质上存在小程序逻辑层运行时中,这个实例不能暴露给业务层,只用于 App 实例使用。
- PageElement :PageElement 是业务对应的业务实例,是可以给业务使用的,上面有 setData,getPageId 方法,在业务打印 this ,就是 PageElement 。如下:
Page({
    onLoad(){
        console.log(this) // PageElement
    }
})
来看一个 PageElement 上最核心的 setData 方法,本质上就是合并 data ,然后调用 page 实例下面的 render 渲染管理器的 render 方法。
接下来在 Navigate 会执行页面的 launch 方法,在页面的 launch 方法中,会向渲染层发送 ready 指令,并把 css 样式发送到渲染层。接下来会调用业务页面的 onLoad 函数,这样的 onLoad 的生命周期就执行了。
接下来会调用 render 方法,开始进入渲染阶段。
- Page 上还有一些其他方法,比如 active 和 unActive,当页面切换的时候,或者应用切入后台或者进入前台的时候,会执行 active 和 unActive 方法,接下来会触发业务的 onShow 或者 onHide 函数。
接下来就到了渲染阶段,来看一下渲染阶段做了哪些事情。
2.2 渲染管理器
渲染阶段是由 Renderer 类处理的,它本身的实现会有一些复杂,最终 page 调用时调用的 Renderer 类的 render 方法。
class Renderer {
    constructor(render, pageInstance) {
        this.renderRuntime = render
        this.pageInstance = pageInstance
        this.vnode = null
        this.nodeId = -1
        this.directList = []
    }
    render() {
        const context = this.createRenderContext()
        const childrenArr = this.renderRuntime(context)
        const newVnode = {
            type: 'page',
            children: childrenArr
        }
        /* 生成虚拟 DOM */
        this.vnode = this.diff(newVnode, this.vnode, 'root')
        /* 发送消息绘制视图 */
        this.commit()
    }
}
首先在 Renderer 初始化的时候,会绑定 render 函数 renderRuntime 和页面实例 pageInstance。
接下来就是 render 函数的执行,执行过程中首先会创建出 render 上下文。 那么什么是 render 上下文呢。
render: function (context) {
      return [context.createNode("view", {
        "props": {}
      }, function (context) {
        return [context.createNode("bottom", {
          "props": {}
        }, function (context) {
          return ["点击"
          ]
        })
        ]
      })
      ]
},
如上 render 方法传入的参数 context 就是 render 上下文,负责获取运行时的状态,生成虚拟 DOM 。这里的上下文我们只用了两个函数—createNode 和 getValue。其中:
- createNode 用来产生虚拟 DOM ,虚拟 DOM 节点设定比较简单,如下所示:
createNode(type, props, children) {
    return {
        type,
        props,
        children: typeof children === 'function' ? children(this.createRenderContext())  : []
    }
}
如上因为 children 也是一个函数,所以这里递归执行 children ,同时传入上下文 context。
- getValue 可以获取逻辑层 data 里面的数据,来渲染真实的元素节点。
getValue(name) {
        /* 获取页面的 data */
    const data = this.pageInstance.pageRef.data || {}
    return data[name]
}- 最后通过 createRenderContext 创建渲染上下文。
createRenderContext() {
    return {
        createNode: this.createNode.bind(this),
        getValue: this.getValue.bind(this)
    }
}
通过渲染函数和渲染上下文创建出虚拟 DOM, 接下来 diff 虚拟 DOM ,构建出渲染指令。
   diff(newVNode, oldVNode, parentId) {
        if (newVNode && !oldVNode) {
            newVNode.parentId = parentId
            newVNode.nodeId = ++this.nodeId
            let content = null
            /* 只有一个 children 并且为 string 字符串的情况 */
            if (newVNode.children.length === 1 && typeof newVNode.children[0] === 'string') {
                content = newVNode.children[0]
            } else {
                this.diffChildren(newVNode, oldVNode, newVNode.nodeId)
            }
            /* 创建绘制指令 */
            const direct = {
                type: CREATE,
                tag: newVNode.type,
                parentId,
                nodeId: newVNode.nodeId,
                content,
                props: newVNode.props
            }
            this.directList.push(direct)
        } else if (!newVNode && oldVNode) { /* 删除元素 */
            /* 创建删除指令 */
            const direct = {
                type: DELETE,
                tag: oldVNode.tag,
                parentId,
                nodeId: oldVNode.nodeId,
            }
            this.directList.push(direct)
        } else { /* 更新元素 */
            newVNode.nodeId = oldVNode.nodeId
            newVNode.parentId = oldVNode.parentId
            const newChildren = newVNode.children
            const oldChildren = oldVNode.children
            /* 满足只有一个文本元素且相等情况 */
            const case3 = newChildren.length === 1 && oldChildren.length === 1 && typeof newChildren[0] == 'string' && typeof oldChildren[0] == 'string'
            const case1 = case3 && newChildren[0] !== oldChildren[0]
            /* 满足新老元素属性都相等的情况 */
            const case2 = deepEqual(newVNode.props, oldVNode.props)
            if (case1 || !case2) {
                const direct = {
                    type: UPDATE,
                    parentId,
                    nodeId: oldVNode.nodeId,
                    content: case1 ? newVNode.children[0] : '',
                    props: newVNode.props
                }
                this.directList.push(direct)
            }

            if(!case3){
                this.diffChildren(newVNode, oldVNode, newVNode.nodeId)
            }
        }
        return newVNode
    }
    diffChildren(newVNode, oldVNode, parentId) {
        const newChildren = newVNode?.children
        const oldChildren = oldVNode?.children
        if (Array.isArray(newChildren)) {
            newChildren.forEach((newChildrenNode, index) => {
                let oldChildrenNode = oldChildren ? oldChildren[index] : null
                this.diff(newChildrenNode, oldChildrenNode, parentId)
            })
        }
    }
如上就是 diff 的核心流程,会对比新老元素:
- 如果新元素存在,老元素不存在,证明是新的节点,需要打上 CREATE 标识。
- 如果新老元素都存在,证明是更新元素节点,如果满足更新条件,那么打上 UPDATE 标识。
- 如果新元素节点不存在,老元素节点存在,证明满足删除条件,打上 DELETE 标识。
- 如果遇到子元素 children ,会通过 diffChildren 递归子元素。
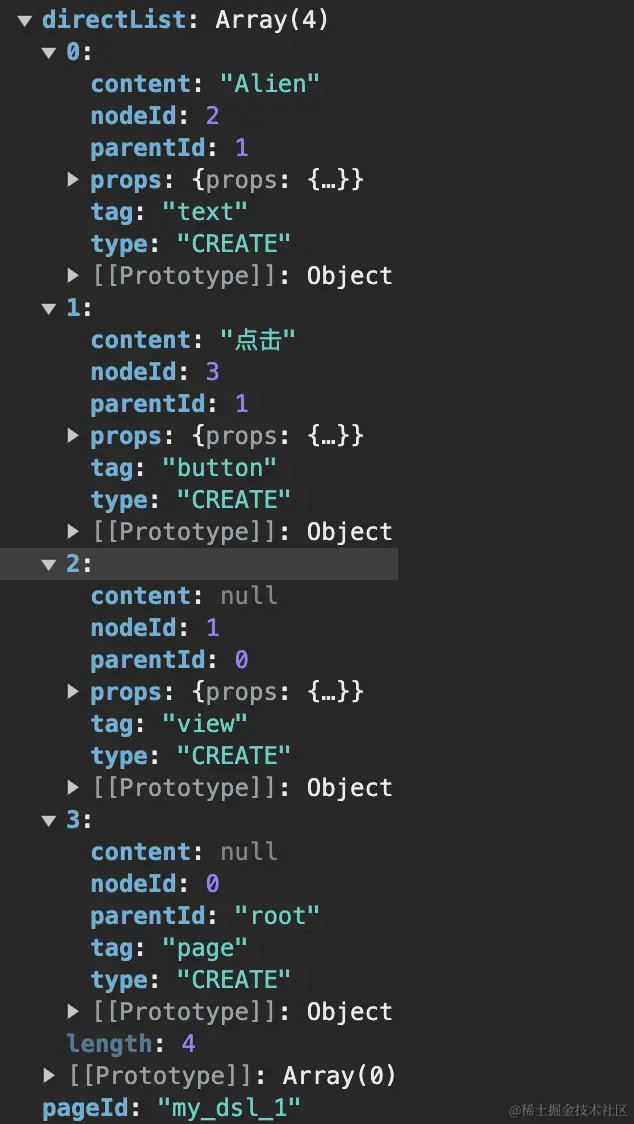
生成的渲染指令样子如下:
有了渲染指令,接下来就需要 commit 方法,处理这些指令。
/* 绘制视图 */
commit(){
    this.pageInstance.render(this.directList)
    this.directList = []
}- commit 回调用 pageInstance 的 render 方法。
 /* 触发更新 */
render(directList){
    this.appInstance.render(this.pageId,directList)
}- pageInstance 会调用 app 的 render 方法,并传入当前 pageId。
render(pageId,directList){
    this.channel.postClientMessage(pageId,'render',directList)
}- app 会把渲染事件和渲染指令传递到视图层。
到此,逻辑层的渲染结束。接下来就是视图层的渲染逻辑了。
三 视图层渲染流程
3.1 渲染视图
有了渲染指令,那么就可以渲染页面了,当渲染指令传递到视图层的时候,会有特别的处理方法 handleDirect 处理渲染指令。
/* 注册渲染任务 */
  window.JSBridge.registerEvent('render', function (res) {
    const { pageId, data } = res
    if (window.pageId === pageId) {
      handleDirect(data)
      window.isInit = true
    }
  })
来看一下 handleDirect 的实现原理。
/* 解析指令 */
function handleDirect(directList) {
    directList.sort((a, b) => a.nodeId - b.nodeId).forEach(item => {
        const { content, nodeId, parentId, props, type, tag } = item
        /* 插入节点  */
        if (type === 'CREATE') {
            let curtag = 'div'
            switch (tag) {
                case 'view':
                    curtag = 'div'
                    break
                case 'text':
                    curtag = 'span'
                    break
                case 'image':
                    curtag = 'img'
                    break
                default:
                    curtag = tag
                    break
            }
            const node = document.createElement(curtag)
            node.id = 'node' + nodeId
            if (content) node.innerText = content
            diffProperty(node,props)
            if (parentId === 'root') {
                const root = document.getElementById('root')
                root.appendChild(node)
            } else {
                const parentNode = document.getElementById('node' + parentId)
                parentNode && parentNode.appendChild(node)
            }
        } else if (type === 'DELETE') {
            const parentNode = document.getElementById('node' + parentId)
            const node = document.getElementById('node' + nodeId)
            parentNode.removeChild(node)
        } else if (type === 'UPDATE') {
            const node = document.getElementById('node' + nodeId)
            if (content) {
                node.innerText = content
            }
            diffProperty(node,props)
        }
    })
    /* 初始化渲染完成,通知逻辑层执行 onReady 事件 */
    if (!window.isInit) {
        setTimeout(() => {
            window.JSBridge.postMessage({
                type: 'ready',
                pageId: window.pageId
            })
        })
    }
}
如上就是 handleDirect 的渲染流程:
- 首先会通过 nodeid 进行渲染指令排序,越小的证明越是外层的节点。外层的节点需要优先创建。
- 接下来会进行标签映射,这里只对三种标签做了映射逻辑。text 对应 span 标签,view 对应 div 标签,image 对应 img 标签。
- 然后会根据不同的指令处理不同的元素, CREATE 会创建元素,DELETE 是删除元素,UPDATE 是更新元素。
- 在完成第一次渲染之后,会通过 postMessage 向逻辑层发送 ready 事件,这样页面逻辑层就会触发 onReady 生命周期了。
如果遇到 props 就会调用 diffProperty 解析 props。
/* 解析 props */
function (node, props) {
     /* 动态添加 style */
    if (props?.props?.style) node.style = props.props.style
    /* 动态添加 class */
    if (props?.props?.class) {
        const arr = props.props.class.split(' ')
        arr.forEach(item=>{
            node.classList.add(item)
        })
    }
    /* 动态添加 src */
    if(props?.props?.src) node.src = props.props.src
    /* 处理点击事件 */
    if (props?.props?.eventtap) {
        node.onclick = function () {
            const eventName = props?.props?.eventtap
            /* 处理事件 */
            window.JSBridge.postMessage({
                type: 'event',
                eventName,
                pageId: window.pageId
            })
        }
    }
}
如上,分别处理了 click 点击事件,style 属性,class 属性和图片的 src 属性。在事件中,会对事件做包装处理,然后把包装的事件传递到逻辑层,并调用逻辑层的事件处理函数。
经过如上流程后,页面就能够正常渲染了。
3.2 渲染样式
对于样式的处理也是比较简单的。首先监听样式事件:
/* 添加样式 */
window.JSBridge.registerEvent('style',function(res){
    const { pageId, data } = res
    if (window.pageId === pageId) {
      /* 装载样式 */
      setCssToStyleHead(data)
    }
})
如果样式对应的字符串传递过来,会调用 setCssToStyleHead 把样式插入到 head 中,其具体流程如下:
function setCssToStyleHead(styleString) {
    let styleText = ''
    styleText = styleString.replace('page', 'body')
    styleText = styleText.replace(/rpx/g, 'px')
    var headElement = document.head
    const style = document.createElement('style')
    style.innerHTML = styleText
    headElement.appendChild(style)
}
如上就是 setCssToStyleHead 的核心逻辑。主要就是样式的替换,page 替换成 body , rpx 替换成浏览器能够识别的 px ,最后创建 style 插入到 head 中。这里和实际微信小程序的实现会有一定出入,微信小程序的实现可以看前面的章节,会有对应的介绍。
待完善点:
- 在整个渲染逻辑中,只对元素的修改做了处理,没有对元素的插入和删除做处理。如果插入或者删除元素,应用就会出现问题,需要后面完善。
四 总结
前面的四个小节,我们从整体设计到从零到一实现了一个小程序 dsl 应用,其中还有一些细枝末节没有讲出来,觉得有帮助的同学,可以亲自实现一遍,在从无到有实现的过程中,会有很多收获。