uni-app 使用wxml-to-canvas 生成海报
下载
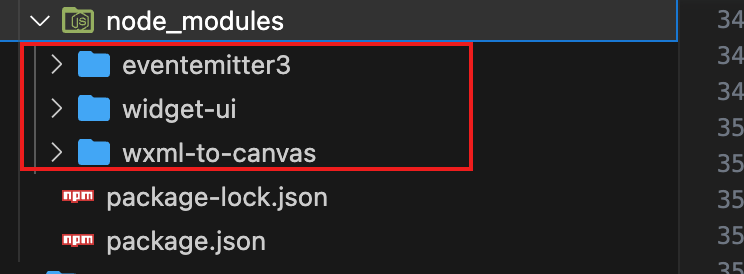
通过npm 下载 wxml-to-canvas
Plain
$ npm i --save wxml-to-canvas拷贝文件
- 将这个三个文件拷贝到 uni-app 项目中
- uni-app新建wxcomponents
- 将三个文件copy到wxcomponents 中
- 修改/wxcomponents/wxml-to-canvas/miniprogram_dist/index.js 544 行的widget-ui的引入方式

引入组件
- 全局引入,每个组件都可以使用
- 局部引入,单个页面使用
全局引入
局部引入: 单个页面index页面
使用
- 使用组件(该组件会绘制canvas)
HTML
<template>
    <view :style="{width: canvasWidth + 'px', height: canvasHeight + 'px' }">
         <wxml-to-canvas class="widget" :width="canvasWidth" :height="canvasHeight"></wxml-to-canvas>
    </view>
</template>- 获取组件实例,可以调用组件内部的方法
HTML
<script>
export default {
  onLoad() {
    this.widget = this.selectComponent('.widget')
  },
}
</script>- 将wxml 生成绘制到canvas中
JavaScript
// 将wxml 生成canvas ,并且绘制在canvas上
const p1 = this.widget.renderToCanvas({
    wxml: `<text class="redText"> 我是简单wxml </view>`,  //wxml 模版
    style:{  //类样式
        redText:{
         color:"red";
        }
    }
})- 将canvas转化成图片
JavaScript
// 调用转化成图片的方法
const p2 = this.widget.canvasToTempFilePath()
p2.then(res => {
  console.log(res.tempFilePath)  // 获取得到的图片地址
})- 将图片保存到本地
JavaScript
wx.saveImageToPhotosAlbum({
      filePath: res.tempFilePath,
      success: function (res) {
        // 图片保存成功的提示
        wx.showToast({
          title: '保存成功',
          icon: 'success',
          duration: 2000
        });
      },
      fail: function (res) {
        // 图片保存失败的提示
        wx.showToast({
          title: '保存失败',
          icon: 'none',
          duration: 2000
        });
      }
    });
完整代码
JavaScript
<template>
        <view class="content">
                <image class="logo" :src="imgUrl"></image>
                <view class="text-area">
                        输入内容生成海报<input style="border: 1px solid #000;" type="text" v-model="value" />
                        <view class="">

                        </view>
                </view>
                <button @click="renderToCanvas">renderToCanvas</button>
                <view :style="{width: canvasWidth + 'px', height: canvasHeight + 'px' }">
                        <wxml-to-canvas class="widget" :width="canvasWidth" :height="canvasHeight"></wxml-to-canvas>
                </view>
        </view>
</template>

<script>
        import {
                wxml,
                style
        } from './demo.js'
        export default {
                data() {
                        return {
                                title: 'Hello',
                                canvasWidth: 320, // 默认canvas宽高
                                canvasHeight: 480,
                                imgUrl: "/static/logo.png",
                                value: ""
                        }
                },
                onLoad() {
                        this.widget = this.selectComponent('.widget')
                        console.log(this.widget)
                        const _this = this;
                        uni.getSystemInfo({
                                success(res) {
                                        console.log(res)
                                        console.log(_this)
                                }
                        })

                        uni.getSystemInfo({
                                success: () => {
                                        console.log(res)
                                        console.log(this)
                                }
                        })
                },
                methods: {
                        renderToCanvas() {
                                const p1 = this.widget.renderToCanvas({
                                        wxml: `
                                        <view class="container" >
                                          <view class="item-box red">
                                          </view>
                                          <view class="item-box green" >
                                            <text class="text">${this.value}</text>
                                          </view>
                                        </view>

                                        `,
                                        style: {
                                                container: {
                                                        width: 300,
                                                        height: 200,
                                                        flexDirection: 'row',
                                                        justifyContent: 'space-around',
                                                        backgroundColor: '#ccc',
                                                        alignItems: 'center',
                                                },
                                                itemBox: {
                                                        width: 80,
                                                        height: 60,
                                                },
                                                red: {
                                                        backgroundColor: '#ff0000'
                                                },
                                                green: {
                                                        backgroundColor: '#00ff00'
                                                },
                                                blue: {
                                                        backgroundColor: '#0000ff'
                                                },
                                                text: {
                                                        width: 80,
                                                        height: 60,
                                                        textAlign: 'center',
                                                        verticalAlign: 'middle',
                                                }
                                        }

                                })
                                p1.then((res) => {
                                        this.container = res
                                        this.extraImage()
                                })
                        },
                        extraImage() {
                                const p2 = this.widget.canvasToTempFilePath()
                                console.log(p2)
                                p2.then(res => {
                                  console.log(res.tempFilePath)  // 获取得到的图片地址

                                 wx.saveImageToPhotosAlbum({
                                       filePath: res.tempFilePath,
                                       success: function (res) {
                                         // 图片保存成功的提示
                                         wx.showToast({
                                           title: '保存成功',
                                           icon: 'success',
                                           duration: 2000
                                         });
                                       },
                                       fail: function (res) {
                                         // 图片保存失败的提示
                                         wx.showToast({
                                           title: '保存失败',
                                           icon: 'none',
                                           duration: 2000
                                         });
                                       }
                                     });
                                }).catch((e)=>{
                                        console.log(e)
                                })
                        }
                }
        }
</script>

<style>
        .content {
                display: flex;
                flex-direction: column;
                align-items: center;
                justify-content: center;
        }

        .logo {
                height: 200rpx;
                width: 200rpx;
                margin-top: 200rpx;
                margin-left: auto;
                margin-right: auto;
                margin-bottom: 50rpx;
        }

        .text-area {
                display: flex;
                justify-content: center;
        }

        .title {
                font-size: 36rpx;
                color: #8f8f94;
        }
</style>
)
)
)
)
)